Today's session will focus on how to do a transaction on the payment journal. Normally we take payment to a vendor on the payment journal. In case a purchase invoice has already been posted, when paying the vendor it needs to be done on the payment journal by applying the posted purchase invoice to the transaction.
Before proceeding to payment, you need to ensure that you have a posted purchase invoice on the system.
Step 1:
Go on the following Menu:
Main Menu --> Department --> Financial Management --> Payable --> Payment Journal.
Step 2:
Choose the batch name you wish to do the transaction.
Step 3:
Fill all the information needed.
| Line No | The line no will be displayed automatically |
| Posting Date | Enter the transaction date |
| Document Type | Enter Payment as document type |
| Document No | If no series has been setup the document no will generate automatically |
| External Document No | Enter external document no |
| Account Type | Choose vendor |
| Account No | Choose the vendor number |
| Description | The name of the vendor will appear here |
| Description 2 | Enter a description of the transaction |
Click on the button Apply Entries.
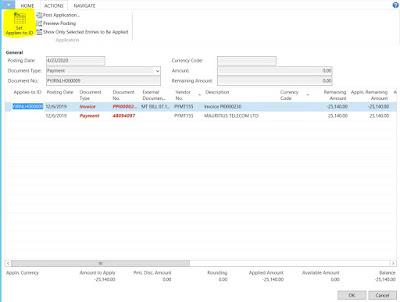
Then choose the invoice you wish to apply, then click on the button Set Applies-to ID to link the invoice with the payment.
Click on OK
| Amount | After applying the invoice, the amount will appear automatically |
| Bal. Account Type | Enter Bank Account as Type |
| Bal. Account No | Choose the Bank Account |
| Bank Payment Type | Select the Bank Payment Type |
| Check Printed | This field show if check has been printed or not |
| Payment Method Code | Choose the payment method Code |
Step 4:
Check printing.
To print check click on the button print check.
Step 5:
Enter the following information.
| Bank Account | Enter the bank account you wish to print the check |
| Last Check No | Upon choosing the bank account the last check no will display automatically |
| Journal Template Name | The template name will display automatically |
| Journal Batch Name | The batch name will display automatically |
Click on Print and choose your printer.
In case you have already printed a check and you wish to cancel the transaction, click on the
button VOID Check.
If you have multiple line and want to void all, click on the button VOID All Checks.
In case you have already printed a check and you wish to cancel the transaction, click on the
button VOID Check.
If you have multiple line and want to void all, click on the button VOID All Checks.
Step 6:
To validate the transaction click on the button POST.
Click on OK to close.


