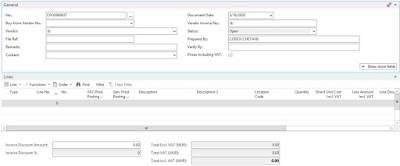
Today's tutorial is on the purchase order creation. A purchase order is a document that allows a company or an individual to buy a service or goods.
Step 1:
Go on the following menu:
Main Menu --> Department --> Purchasing --> Order Processing --> Purchase Order.
Click on the button New and enter the following information.
General
| |
| No | If no series has been setup, the purchase order number will generate automatically |
| Buy-from vendor No | Enter the vendor number |
| Vendor | The vendor name will display automatically |
| File Ref | Enter the file reference |
| Remarks | Enter any remark |
| Contact | If the vendor has a contact person, the name will appear here |
| Document Date | The document date will display automatically |
| Posting Date | The posting date will display automatically or you can enter it manually |
| Due Date | Due date will be calculated automatically |
| Vendor Invoice No | Enter the vendor invoice number |
| Order No | If the purchase order has been created from a quote, the quote number will appear here |
| Status | Status of the purchase order. |
| Lines | |
| Line No | Line No will display automatically |
| Type | Enter the Type |
| No | Enter the Type No |
| VAT Prod Posting Group | Enter the VAT product posting group |
| Gen. Prod Posting Group | Enter the general product posting group |
| Description | The name of the No will appear here |
| Description 2 | Enter a description |
| Location Code | Enter a location Code |
| Quantity | Enter the quantity |
| Direct Unit Cost | Enter the unit cost |
| Line Amount | Quantity * Unit Cost |
| Line Discount % | Enter a discount in term of percentage |
| Line Discount Amount | Enter a discount amount. |
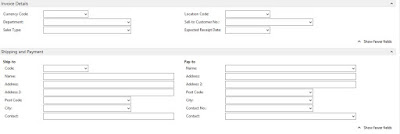
Invoice Details
| |
| Currency Code | Enter the currency code if the invoice is foreign |
| Global Dimension 1 | Enter Dimension if there is |
| Global Dimension 2 | Enter Dimension if there is |
| Location Code | Enter location code |
| Sell to customer no | Enter the customer no |
| Expected Receipt Date | Enter the date the product will be delivered |
Shipping and Payment
| |
| Ship-to | If the product will be shiped to another location |
| Code | Enter Address Code |
| Name | Name will appear automatically |
| Address | Address will appear automatically |
| Address 2 | Address will appear automatically |
| Post Code | Post Code will appear automatically |
| City | City will appear automatically |
| Contact | Contact will appear automatically |
| Pay-to | if payment will be done to another vendor |
| Name | Choose the vendor |
| Address | Address will appear automatically |
| Address 2 | Address will appear automatically |
| Post Code | Post code will appear automatically |
| City | City will appear automatically |
| Contact No | If the vendor has a specific contact person enter the number here |
| Contact | Name of the contact will appear automatically. |
Step 3:
Click on the button Release.
This will set the status of the purchase order to Released.
The process above can be done via an approval process also.
Step 4:
Click on POST to validate the transaction.
Step 5:
If the person has receive as permission, he will be able to do receive only
If the person has invoice as permission, he will be able to do only invoice only
If the person has receive and invoice as permission, he will be able to do both at the same time.
Click OK to close.


