Wednesday, April 15, 2020

Run General Ledger Entries on Microsoft Dynamics Nav Business Central

Dear Friends,

Today we will learn about general ledger entries. The general ledger entries display transactions done and if a G/L Account is involved, the transaction will be recorded in the general ledger entries.

To access General Ledger Entry go on the following menu:

Main Menu --> Department --> Financial Management --> General Ledger --> General Ledger Entries.


Run Standard Detail Trial Balance and Trial Balance on Microsoft Dynamics Nav Business Central

Hello viewers,

Accounting people always use the trial balance and detail trail balance to check their G/L account transaction. Today we will learn how to run the report.

Go on the following menu:

Main Menu --> Department --> Financial Management --> General Ledger

1. Detail Trail  Balance


You can filter the report by the following field.

No.You can run the trial balance by G/L number
Search NameYou can run the trial balance by search name
Income/BalanceYou can run the trial balance by income statement or balance sheet
Debit/CreditYou can run the trial balance by Debit or Credit Account
Date FilterYou can run the trial balance by date filer


2. Trail Balance


Enter the filter to run the report.

NoYou can run the report by G/L Account No
Account TypeYou can run the report by Account Type
Date FilterYou can run the report by Date Filter


Creation of Fixed Asset Posting Group on Microsoft Dynamics Nav Business Central

Dear Friends,

Today we will learn how to setup FA posting group. This setup is very important for acquisition and depreciation of fixed asset.

Step 1:

To proceed with the setup go on the following menu:

Main Menu --> Department --> Financial Management --> Setup --> FA Posting Group.


Step 2:

Click on the button New and Fill the following information

CodeEnter a code for the posting group
Acquisition Cost AccountEnter the Acquisition G/L Account
Accum. Depreciation AccountEnter the Accumulated Deprecation G/L Account
Write-Down AccountEnter the write down G/L Account
Appreciation AccountEnter the Appreciation G/L Account
Custom 1 Account
Custom 2 Account
Maintenance Expense Account
Acq. Cost Acc. on DisposalEnter the acquisition cost G/L Account on disposal
Accm. Depr. Acc. on DisposalEnter the depreciation G/L Account on disposal
Write-Down Acc. on DisposalEnter the write down G/L Account on disposal
Appreciation Acc. on  DisposalEnter the appreciation G/L Account on disposal
Custom 1 Account on Disposal
Custom 2 Account on Disposal
Gains Acc. on DisposalEnter the gain G/L Account on disposal
losses Acc. on DisposalEnter the losses G/L Account on disposal

Step 3:

Enter the Balancing account.


Fill all the necessary information.

Acquisition Cost Bal. AccEnter the acquistion cost balance G/L account
Depreciation Expense AccEnter the Depreciation G/L expense account
Write-Down Expense AccEnter the write down G/L expense account
Appreciation Bal. AccountAppreciation G/L balance account
Custom 1 Expense Acc
Custom 2 Expense Acc
Sales Bal AccEnter the sale balance G/L Account
Maintenance Bal. AccEnter the Maintenance Balance G/L Account
Write-Down Bal. Acc on DispEnter the write down Balance G/L Account on disposal
Apprec. Bal Acc. DispEnter the balance G/L Account on disposal
Custom 1 Bal. Acc on disposal
Custom 2 Bal. Acc on disposal

Create a trial balance by account schedule on Microsoft Dynamics Nav Business Central

Hello Friends,

Today we will learn how to create a trial balance on account schedule. This tool permits us to create our customized report.

Step 1:

To create an account schedule, go on the following menu:

Main Menu --> Department --> Financial Management --> General Ledger --> Account Schedule.


Step 2:

Click on the button New and fill the following information.

NameEnter a name for the account schedule
DescriptionEnter a description for the account schedule
Default ColumnNeed to create columns
Analysis View NameIf you want to associate a analysis view with the account schedule

Step 3:

To add a column click on the drop down of the field Default Column


The following page will open.

fill the following information:

NameEnter a name
DescriptionEnter a description
Analysis View NameIf there is analysis view that need to be linked

Step 4:

Click on Edit Column Layout setup and fill the following information.


Column NoAdd a column no
Column HeaderEnter the name of the column header
Column TypeEnter type of the column
Ledger Entry TypeEnter entries in ledger entry type
Amount TypeEnter the type of the amount
FormulaEnter formula if any
Show opposite signIf you want to show opposite sign in amount
Comparison date formulaLet it blank
ShowEnter always if you want the field to be display
Rounding FactorEnter the rounding factor

Click on OK

Step 5:

To test the account schedule go on the main page and click on overview.


After clicking on overview, the report will appear.


Tuesday, April 14, 2020

General Journal on Microsoft Dynamics Nav Business Central

Hello Friends,

Today's tutorial is about doing a journal.  The aim of doing journal is to make adjustment in the system. On Microsoft Dynamics Nav Business Central, you can do a journal in different way and you can do it as follows.

1. G/L Account to G/L Account
2. Vendor to G/L Account
3. Customer to G/L Account
4. Bank Account to Bank Account
5. Vendor to Bank Account
6. Customer to Bank Account
7. G/L Account to Bank Account

Step 1:

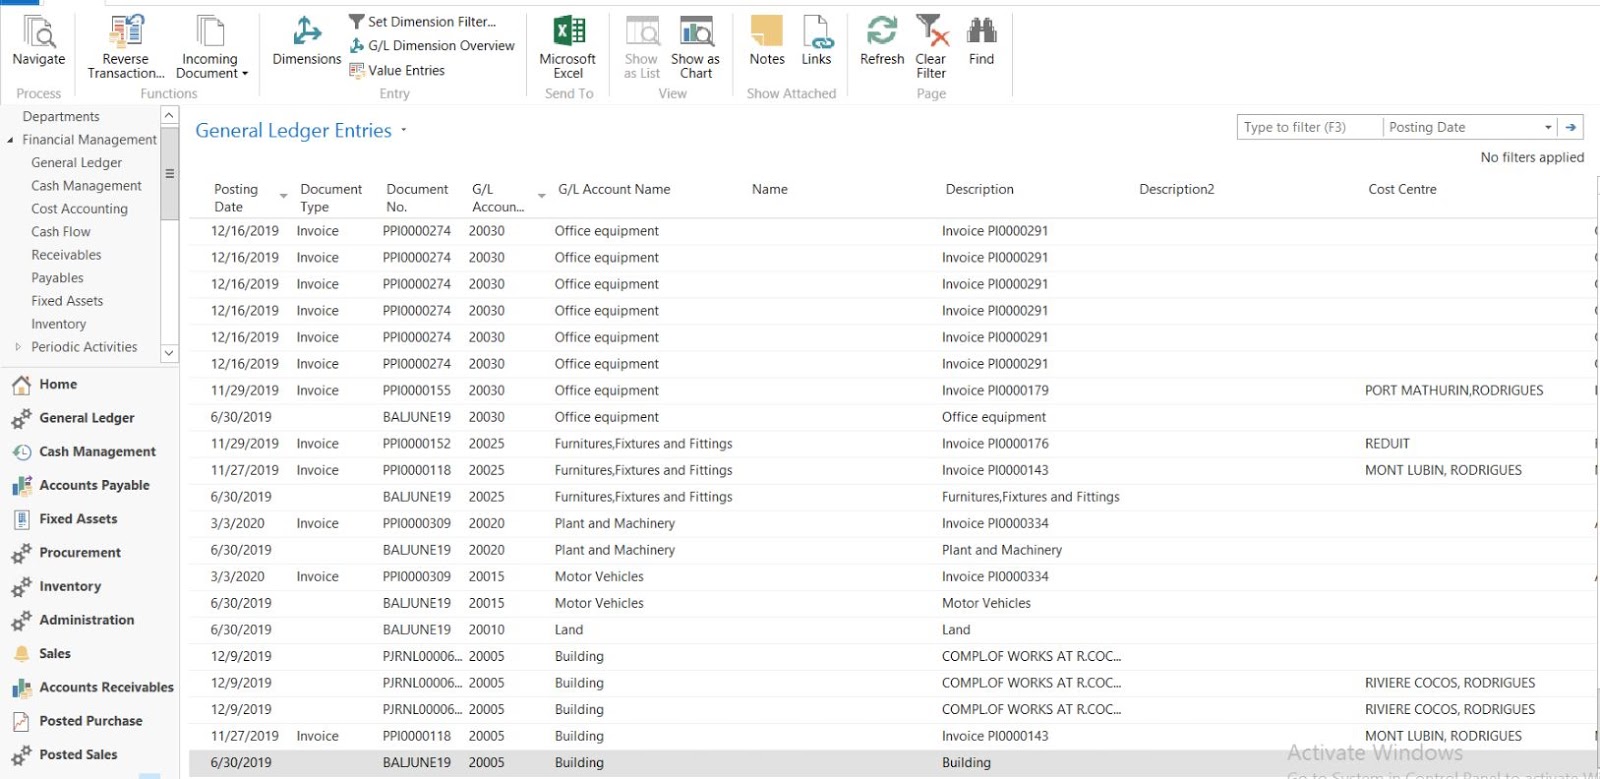
To open the journal, go on the following menu:

Main Menu --> Department --> Financial Management --> General Ledger --> General Journal.


Step 2:

Fill all the necessary information.

Batch NameChoose the Batch Name
Line NoThe line no will display automatically
Posting DateEnter the date of the transaction
Document TypeEnter the document type of the transaction
Document NoDocument no will be display automatically if no of series has been setup
Account TypeEnter the account Type for the debited amount
Account NoEnter the account No for the debited amount
Account NameUpon Choosing the account no, the name of the account will display automatically
DescriptionEnter a description for the transaction
AmountEnter the amount (if amount to be credited then negative amount else if amount to be debited then amount is positive)
Amount (LCY)If foreign currency has been used, the amount will be converted to local currency here
Bal. Account TypeEnter the destination account type (Account to be credited)
Bal. Account NoEnter the destination account no (Account to be credited)
Deferral CodeEnter a deferral code if you need to use
External Document NoAdd an external document no
Currency Codeenter the currency code you are using.

Step 3:

After entering all the date click on the button POST to validate the date and post it to the correct G/L account.

Click on OK to close

Creation of G/L Budget on Microsoft Dynamics Nav Business Central

Dear Friends,

In this tutorial we will learn how to create a budget for a G/L Account. Budgeting is done when a specific amount is assigned to a specific G/L account in order to have a better control when the amount is being credited or debited.

Step 1:

To create a budget click go on the following menu:

Main Menu --> Department --> Financial Management --> General Ledger --> G/L Budgets


Step 2: 

 Click on the button New and fill the following information

NameEnter the name of the budget
DescriptionGive a description for the button
Global Dimension 1 CodeGlobal Dimension 1 will display automatically
Global Dimension 2 CodeGlobal Dimension 2 will display automatically
Budget Dimension 1 CodeIf you want to put another dimension
Budget Dimension 2 CodeIf you want to put another dimension
Budget Dimension 3 CodeIf you want to put another dimension
Budget Dimension 4 CodeIf you want to put another dimension
BlockedIf the budget is not longer in use

Step 3:

Click on the button Edit Budget and add the following information


General
Budget NameThe Budget name will appear automatically
Show as LinesLet it be G/L Account
Show as ColumnLet it be period
View ByThe frequency you want to see, here we have chosen month
Rounding FactorIf you have any rounding factor
Show column NameInstead of month and year, you can display the name of the month completely
Budget Matrix
Budget AmountThis will represent the total amount of all the amount from months
Month (JAN 2020, FEB 2020)You will need to enter the amount budget for the specific G/L
Filters
Date FilterIf you want to filter by a specific date
G/L Account FilterIf you want to filter per G/L Account
G/L Account Category FilterIf you want to filter by Account Category
Income/Balance G/L Account FilterIf you want to filter by Income statement or Balance sheet
Global Dimension 1 CodeChoose a global dimension if you need
Global Dimension 2 CodeChoose a global dimension if you need
Budget Dimension 1 CodeUpon creating the budget if you have enter budget dimension it will appear here automatically
Budget Dimension 2 CodeUpon creating the budget if you have enter budget dimension it will appear here automatically
Budget Dimension 3 CodeUpon creating the budget if you have enter budget dimension it will appear here automatically
Budget Dimension 4 CodeUpon creating the budget if you have enter budget dimension it will appear here automatically

Click on OK to close.

Creation of G/L Account on Microsoft Dynamics Nav Business Central

Hello Friends,

In this tutorial, we will learn how to create a G/L account on business central. A general ledger account is used to debit and credit amount while a list G/L Account is know as a chart of account.

Step 1:

To create a G/L Account go on the following menu:

Main Menu --> Department --> Financial Management --> General Ledger --> Chart of account.


Step 2: 

Click on the button New and fill the required information

General
NoEnter the number of the G/L Account
NameEnter the name of the G/L Account
Name 2If the name is long, split the name and enter the second part here
Vendor NameIf the G/L account is linked with a vendor enter the vendor name
Bank Account NoIf the G/L account is linked with a bank account no enter the account no 
Income/BalancePrecise whether the account is an income statement or a balance sheet
Account CategorySelect an account category
Account SubcategorySelect an account subcategory
Debit/CreditAlways enter both
Account TypeSelect an account type
TotalingWhen you will indent the chart of account the totaling field will be populated automatically
Search NameIf you want to enter a search name for the G/L account
Direct PostingIf this field is checked, mean you can post transaction in the G/L Account
BlockedIf the G/L account is no longer in use, you can blocked it so that it will not appear in trial balance
Posting
Gen. Posting TypeEnter a General Posting Type
Gen. Bus. Posting GroupEnter a General Business Posting Group
Gen. Prod Posting GroupEnter a General Product Posting Group
VAT. Bus. Posting GroupIf the G/L Account is taxable enter the VAT Business Posting Group
VAT. Prod. Posting GroupIf the G/L Account is taxable enter the VAT Product Posting Group
Consolidation
Consol. Debit Acc.If consolidation need to be done, enter the Debit Account
Consol. Credit Acc.If consolidation need to be done, enter the Credit Account

Click on OK to close.

Sunday, April 12, 2020

Creation of Inventory Posting Setup on Microsoft Dynamics Nav Business Central

Dear Friends,

Today in our tutorial we will learn how to setup inventory posting. This setup determines the inventory account in the general ledger to which the program posts for transactions involving this item (any transaction related to Item Inventory).

Step 1:

To do the setup go on the following menu:

Main Menu --> Department --> Financial Management --> Setup --> Inventory Posting Setup


Step 2: 

Click on the button New and fill the required information.

Location CodeEnter the location
Inv. Posting Group CodeEnter the inventory posting group
DescriptionEnter a description
Inventory AccountEnter the inventory G/L account
Inventory Account (interim)If you want to use an interim account during good receive enter the G/L Account here
WIP AccountIn case you are you work in progress, enter the work in progress G/L Account
Material Variance AccountEnter the Material Variance G/L Account
Capacity Variance AccountEnter the Capacity Variance G/L Account
Mfg. Overhead Variance AccountEnter the Manufacturing Overhead Variance G/L Account
Cap. Overhead Variance AccountEnter the Capacity Overhead Variance G/L Account
Subcontracted Variance AccountEnter the subcontracted variance G/L Account

Thursday, April 9, 2020

Creation of Inventory Posting Group on Microsoft Dynamics Nav Business Central

Hello friends,

Today we will learn how to create an inventory posting group.

Step 1:

To proceed with the creation go on the following menu:

Main Menu --> Department --> Financial Management --> Setup --> Inventory Posting Group.


Step 2:

Click on the button New and fill the following information.

CodeEnter a code for the posting group
DescriptionEnter a description

Click on OK to close

Creation of Bank Account Posting Group on Microsoft Dynamics Nav Business Central

Dear Friends,

In this tutirial we will learn how to create a bank account posting group. This setup is a link between a bank account and a G/L Account.

Step 1:

To create the posting group go on the following menu:

Main Menu --> Department --> Financial Management --> Setup --> Bank Account Posting Group.


Step 2:

Click on the button New and fill the information.

CodeEnter a code to the posting group
G/L Account No.Enter the G/L Account correspond to the posting group

Click on OK to close.