Monday, April 27, 2020

Configuration of user setup on Microsoft dynamics nav business central

Dear Friends,

Today's tutorial is on how to configure user setup. This configuration is important as it determines what a user can do on the system.

To proceed to user setup go on the following menu:

Main Menu --> Department --> Administration --> Application --> Users --> User Setup.


Step 1:

Click on the button New and fill the information.

User IDSearch the user id
Allow posting fromSpecify the date range the user can post transaction
Allow posting toSpecify the date range the user can post transaction
Register TimeIf the system has a time register, this will allow user to register time
Sales Pers./Purch. CodeIf there is a sales person or purchaser code attached to the user
Allow to create new p.orderThis will let the user to create purchase order.
Modify Qty in blanket orderThis will allow the user to modify blanket order
Fields visibility in p.orderThis will allow user to see important fields such as direct unit cost
Item general viewThis will allow user to view items
Purchase order post optionThis will determine the posting right of the user
Print po with costThis will allow user to print purchase order with cost
Access to void checkThis will allow user to void check.
Allow VAT group changeThis will allow user to change vat prod posting group in invoices.
Time Sheet AdminThis will determine who will be admin for time sheet
E-mailEemail address of the user need to be inserted, in case to send mail to the user.

Click on OK to close.

Approval Entries for Payable on Microsoft Dynamics Nav Business Central

Dear Friends,

In this tutorial, we will learn where to approve a request in payable. Normally many users wish to have a hierarchy level in their company, where each level has a set of rights on the system. The user can set up a workflow which prevents a low level user to post a purchase invoice and the user need to send the purchase invoice through an approval process to validate the invoice.

To access the approval page go on the following menu:

Main Menu --> Department --> Financial Management --> Payable --> Request to Approve.


a). Approve purchase invoice.

      Select the purchase invoice you wish to validate and click on the button Approve.

b). Reject purchase invoice

       Select the purchase invoice you wish to revoke and click on the button Reject.

c). Reassign the purchase invoice to get approval from another approver.

      Select the purchase invoice you wish to reassign and click on the button Delegate.

d). In case you wish to know the content of the purchase invoice, click on the button Open Invoice

Sunday, April 26, 2020

Verification of vendor ledger entries on Microsoft Dynamics Nav Business Central

Dear Friends,

I trust you are doing well, today we will learn on vendor ledger entries.  This part is important because any transaction done on a vendor (transaction can be a payment, invoicing or even journal entry) will be recorded. Vendor ledger entries are mostly used to do reporting or investigation when an occurrence arises.

To access the page vendor ledger entries go on the following menu:

Main Menu --> Department --> Financial Management --> Payable --> Vendor Ledger Entries.


a). If you want to check what invoices have been applied to a payment. Select the payment line then click on the button Applied Entry.


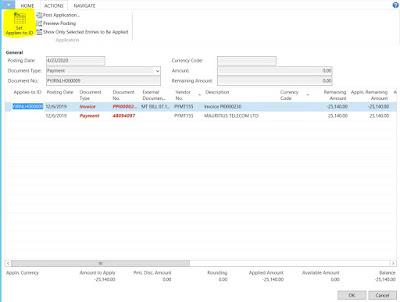
b). If ever a payment has been done without applying an invoice and the invoice has been created at a later stage, click on the button Apply Entries


Select the invoice line, then click on the button Set Applies to ID then click on the button Post Application

c.) If ever you wish to unapply an invoice from a payment click on the button unapply entries.


Select the invoice line and click on the button unapply.

d). If you wish to reverse a payment or transaction, first you need to check if there is an invoice attached to the payment, reverse it then click on the button Reverse Transaction.


e). You can create a payment on this page directly, select the invoice line then click on the button Create Payment.


Fill the information needed.

Batch NameSelect the Batch Name
Posting DateEnter the posting date
Starting Document NoIf no series has been setup, the document no will generate automatically
Bank AccountSelect the bank account type
Payment TypeLet this field blank

Click on button OK

Friday, April 24, 2020

Run Payable Report on Microsoft Dynamics Nav Business Central

Dear Friends,

Today we will do a small tutorial on how to run some important payable reports. To access the report menu go on:

Main Menu --> Department --> Financial Management --> Payable

Run Report Age Account Receivable.


Aged As OfEnter the date you wish to run as at
Aging byEnter Posting date
Period LengthEnter the Period Length 1 month
Print Amounts in LCYIf you want to print the report in local currency
Print DetailsIf you want to print more detail


Run Report Vendor - detail trial balance


If you want to show the report in local currency check the checkbox.


Wednesday, April 22, 2020

Payment Journal transaction on Microsoft Dynamics Nav Business Central

Dear Friends,

Today's session will focus on how to do a transaction on the payment journal. Normally we take payment to a vendor on the payment journal. In case a purchase invoice has already been posted, when paying the vendor it needs to be done on the payment journal by applying the posted purchase invoice to the transaction.

Before proceeding to payment, you need to ensure that you have a posted purchase invoice on the system.

Step 1:

Go on the following Menu:

Main Menu --> Department --> Financial Management --> Payable --> Payment Journal.


Step 2: 

Choose the batch name you wish to do the transaction.

Step 3: 

Fill all the information needed.

Line NoThe line no will be displayed automatically
Posting DateEnter the transaction date
Document TypeEnter Payment as document type
Document NoIf no series has been setup the document no will generate automatically
External Document NoEnter external document no
Account TypeChoose vendor
Account NoChoose the vendor number
DescriptionThe name of the vendor will appear here
Description 2Enter a description of the transaction

Click on the button Apply Entries.


Then choose the invoice you wish to apply, then click on the button Set Applies-to ID to link the invoice with the payment.

Click on OK

AmountAfter applying the invoice, the amount will appear automatically
Bal. Account TypeEnter Bank Account as Type
Bal. Account NoChoose the Bank Account
Bank Payment TypeSelect the Bank Payment Type
Check PrintedThis field show if check has been printed or not
Payment Method CodeChoose the payment method Code

Step 4: 

Check printing.

To print check click on the button print check.


Step 5:

Enter the following information.


Bank AccountEnter the bank account you wish to print the check
Last Check NoUpon choosing the bank account the last check no will display automatically
Journal Template NameThe template name will display automatically
Journal Batch NameThe batch name will display automatically

Click on Print and choose your printer.

In case you have already printed a check and you wish to cancel the transaction, click on the
button VOID Check.

If you have multiple line and want to void all, click on the button VOID All Checks.


Step 6:

To validate the transaction click on the button POST.


Click on OK to close.

Purchase Credit Memo creation on Microsoft Dynamics Nav Business Central

Dear Friends,

Today we will learn how to create a purchase credit memo in case a purchase invoice has been created incorrectly and posted. The aim of a purchase credit memo is to cancel a purchase invoice transaction and reverse all amount from G/L Account.

Step 1:

Go on the following menu:

Main Menu --> Department --> Financial Management --> Payable --> Purchase Credit Memos.


Step 2:

Click on the button New and click on the tab navigate.


Step 3:

After clicking on the button Copy Document.


1. Choose the document type posted invoice, because we will reverse a posted purchase invoice.
2. Search the Posted Purchase Invoice Number
3. Click on the checkbox Include Header to bring the header information on the credit memo

Click on OK.

Step 4:

The system will take the information in the posted invoice to filled the credit memo automatically. Click on the button POST to validate the purchase credit memos.


Click on OK to close

Tuesday, April 21, 2020

Purchase Invoice Creation on Microsoft Dynamics Business Central

Dear Friends,

Today we will learn how to create a purchase invoice on Microsoft Dynamic Nav Business Central. A purchase invoice is a document that a buyer uses to present a payment to a seller. The use of purchase invoice is to track any payment done for audit purposes.

Step 1:

To create a purchase invoice go on the following menu:

Main Menu --> Department --> Financial Management --> Payable --> Purchase Invoice.

Step 2:

Click on the button New and fill the following information.


General
Vendor NoEnter the Vendor Number
Vendor NameVendor Name will display automatically
AddressAddress will display automatically
Address 2Address 2 will display automatically
CityCity will display automatically
Post CodePost Code will display automatically
Country/Region codeRegion code will display automatically
Contact NoChoose the contact person from the vendor
ContactContact person name will display automatically
Document DateDocument will be filled automatically
Posting DatePosting date will be taken as today's date but can be changed
Due dateDue date is calculated as per the payment term code
Vendor Invoice NoEnter the vendor invoice no
File RefEnter the file reference where the invoice is
Posting DescriptionEnter a posting description
StatusStatus will be set automatically as per level of the invoice has reached


Lines
Line NoLine Number will be displayed automatically
TypeEnter the type of the transaction line
NoEnter the no of the type
DescriptionThe name of the type number will display automatically
Description 2Enter a description for the transaction
Location CodeEnter a location code if there are
QuantityEnter the quantity to purchase
Unit of MeasureEnter the unit of measure
Direct Unit Cost Excl. VATEnter the unit cost excluding vat
Line Amount Excl. VATLine amount will be calculate with quantity by unit cost
Line Discount %Enter a discount % if there is
Line Discount AmountEnter a discount amount if there is
Gen. Prod Posting GroupThe general product posting group will appear automatically
VAT Prod. Posting GroupEnter the VAT product posting code


Invoice Details
Currency CodeEnter the currency code of the foreign invoice
Price including VATIf the user wants to enter unit cost including vat, then checked this field
Global Dimension 1 CodeEnter Global dimension 1 code
Global Dimension 2 CodeEnter Global dimension 2 code


Shipping and Payment
Ship-toIf the user wish the goods being delivered to another location or address
NameEnter the name
AddressEnter the address
Address 2Enter the address 2
CityEnter the city
Post CodeEnter the Post Code
Country/RegionEnter the Region
ContactIf their is a contact person there
Pay-toIf payment need to be done to another vendor

Vendor Creation on Microsoft Dynamics Nav Business Central

Dear Friends,

Today we will learn how to create a vendor on the ERP. By definition, a vendor is a person or a company that supplies goods or services.

Step 1:

Go on the following menu to create the vendor.

Main Menu --> Department --> Financial Management --> Payable --> Vendors


Step 2: 

Click on the button New and fill the following information.


General
NoIf no series has been parameter, the no will generate automatically
NameEnter the name of the supplier
Name 2If the name is long enter the remaining name here
BlockedIf there is no activity on the vendor, you can block it to prevent further transaction
Search NameYou can enter a short name in order to facilitate user to search the vendor
Address & Contact
AddressEnter the address 1
Address 2Enter the address 2
CityEnter the city
Post CodeEnter the post code
Country/Region CodeEnter the region code
Contactif the vendor has a specify contact person
Phone No.Enter the vendor phone number
EmailEnter the vendor email address
Fax No.Enter vendor fax no
Invoicing
VAT Registration NoEnter the VAT registration number
BRNEnter the business registration number
NIDIf the the vendor is an individual, enter the national identity card number
Gen. Bus Posting GroupEnter the General Business Posting Group
VAT Bus Posting GroupEnter the vat business posting group
Vendor Posting GroupEnter the vendor posting group (Creditor control)
Currency CodeIf the vendor is a foreigner, enter his currency
Payments
Application MethodLet the method be manual
Payment Term CodeEnter the payment term
Payment Method CodeEnter the payment method

Step 3:
To enter vendor bank information, go on the tab Navigate then click Bank Account


Step 4:
Click on the button New and enter the following information


General
CodeEnter a code for the bank
NameEnter Bank Name
AddressEnter address 1
Address 2Enter Address 2
Post CodeEnter Post Code of the bank
CityEnter City of the bank
Country/Region CodeEnter region code of bank
Phone NoEnter Bank Phone number
ContactIf the bank has a specific person to contact
Currency CodeIf the bank is foreign, enter the foreign currency
Bank Branch NoEnter bank branch number
Bank Account NoEnter bank account no
Transit No.Enter transit no
Communication
Fax No.Enter fax number
EmailEnter email address
Home PageEnter website of the bank
Transfer
Swift CodeEnter the swift code of the bank
IBANEnter the IBAN of the bank
Bank Clearing StandardEnter the clearing standard
Bank Clearing CodeEnter the clearing code

Click on OK to close

Wednesday, April 15, 2020

Run General Ledger Entries on Microsoft Dynamics Nav Business Central

Dear Friends,

Today we will learn about general ledger entries. The general ledger entries display transactions done and if a G/L Account is involved, the transaction will be recorded in the general ledger entries.

To access General Ledger Entry go on the following menu:

Main Menu --> Department --> Financial Management --> General Ledger --> General Ledger Entries.


Run Standard Detail Trial Balance and Trial Balance on Microsoft Dynamics Nav Business Central

Hello viewers,

Accounting people always use the trial balance and detail trail balance to check their G/L account transaction. Today we will learn how to run the report.

Go on the following menu:

Main Menu --> Department --> Financial Management --> General Ledger

1. Detail Trail  Balance


You can filter the report by the following field.

No.You can run the trial balance by G/L number
Search NameYou can run the trial balance by search name
Income/BalanceYou can run the trial balance by income statement or balance sheet
Debit/CreditYou can run the trial balance by Debit or Credit Account
Date FilterYou can run the trial balance by date filer


2. Trail Balance


Enter the filter to run the report.

NoYou can run the report by G/L Account No
Account TypeYou can run the report by Account Type
Date FilterYou can run the report by Date Filter


Creation of Fixed Asset Posting Group on Microsoft Dynamics Nav Business Central

Dear Friends,

Today we will learn how to setup FA posting group. This setup is very important for acquisition and depreciation of fixed asset.

Step 1:

To proceed with the setup go on the following menu:

Main Menu --> Department --> Financial Management --> Setup --> FA Posting Group.


Step 2:

Click on the button New and Fill the following information

CodeEnter a code for the posting group
Acquisition Cost AccountEnter the Acquisition G/L Account
Accum. Depreciation AccountEnter the Accumulated Deprecation G/L Account
Write-Down AccountEnter the write down G/L Account
Appreciation AccountEnter the Appreciation G/L Account
Custom 1 Account
Custom 2 Account
Maintenance Expense Account
Acq. Cost Acc. on DisposalEnter the acquisition cost G/L Account on disposal
Accm. Depr. Acc. on DisposalEnter the depreciation G/L Account on disposal
Write-Down Acc. on DisposalEnter the write down G/L Account on disposal
Appreciation Acc. on  DisposalEnter the appreciation G/L Account on disposal
Custom 1 Account on Disposal
Custom 2 Account on Disposal
Gains Acc. on DisposalEnter the gain G/L Account on disposal
losses Acc. on DisposalEnter the losses G/L Account on disposal

Step 3:

Enter the Balancing account.


Fill all the necessary information.

Acquisition Cost Bal. AccEnter the acquistion cost balance G/L account
Depreciation Expense AccEnter the Depreciation G/L expense account
Write-Down Expense AccEnter the write down G/L expense account
Appreciation Bal. AccountAppreciation G/L balance account
Custom 1 Expense Acc
Custom 2 Expense Acc
Sales Bal AccEnter the sale balance G/L Account
Maintenance Bal. AccEnter the Maintenance Balance G/L Account
Write-Down Bal. Acc on DispEnter the write down Balance G/L Account on disposal
Apprec. Bal Acc. DispEnter the balance G/L Account on disposal
Custom 1 Bal. Acc on disposal
Custom 2 Bal. Acc on disposal

Create a trial balance by account schedule on Microsoft Dynamics Nav Business Central

Hello Friends,

Today we will learn how to create a trial balance on account schedule. This tool permits us to create our customized report.

Step 1:

To create an account schedule, go on the following menu:

Main Menu --> Department --> Financial Management --> General Ledger --> Account Schedule.


Step 2:

Click on the button New and fill the following information.

NameEnter a name for the account schedule
DescriptionEnter a description for the account schedule
Default ColumnNeed to create columns
Analysis View NameIf you want to associate a analysis view with the account schedule

Step 3:

To add a column click on the drop down of the field Default Column


The following page will open.

fill the following information:

NameEnter a name
DescriptionEnter a description
Analysis View NameIf there is analysis view that need to be linked

Step 4:

Click on Edit Column Layout setup and fill the following information.


Column NoAdd a column no
Column HeaderEnter the name of the column header
Column TypeEnter type of the column
Ledger Entry TypeEnter entries in ledger entry type
Amount TypeEnter the type of the amount
FormulaEnter formula if any
Show opposite signIf you want to show opposite sign in amount
Comparison date formulaLet it blank
ShowEnter always if you want the field to be display
Rounding FactorEnter the rounding factor

Click on OK

Step 5:

To test the account schedule go on the main page and click on overview.


After clicking on overview, the report will appear.


Tuesday, April 14, 2020

General Journal on Microsoft Dynamics Nav Business Central

Hello Friends,

Today's tutorial is about doing a journal.  The aim of doing journal is to make adjustment in the system. On Microsoft Dynamics Nav Business Central, you can do a journal in different way and you can do it as follows.

1. G/L Account to G/L Account
2. Vendor to G/L Account
3. Customer to G/L Account
4. Bank Account to Bank Account
5. Vendor to Bank Account
6. Customer to Bank Account
7. G/L Account to Bank Account

Step 1:

To open the journal, go on the following menu:

Main Menu --> Department --> Financial Management --> General Ledger --> General Journal.


Step 2:

Fill all the necessary information.

Batch NameChoose the Batch Name
Line NoThe line no will display automatically
Posting DateEnter the date of the transaction
Document TypeEnter the document type of the transaction
Document NoDocument no will be display automatically if no of series has been setup
Account TypeEnter the account Type for the debited amount
Account NoEnter the account No for the debited amount
Account NameUpon Choosing the account no, the name of the account will display automatically
DescriptionEnter a description for the transaction
AmountEnter the amount (if amount to be credited then negative amount else if amount to be debited then amount is positive)
Amount (LCY)If foreign currency has been used, the amount will be converted to local currency here
Bal. Account TypeEnter the destination account type (Account to be credited)
Bal. Account NoEnter the destination account no (Account to be credited)
Deferral CodeEnter a deferral code if you need to use
External Document NoAdd an external document no
Currency Codeenter the currency code you are using.

Step 3:

After entering all the date click on the button POST to validate the date and post it to the correct G/L account.

Click on OK to close

Creation of G/L Budget on Microsoft Dynamics Nav Business Central

Dear Friends,

In this tutorial we will learn how to create a budget for a G/L Account. Budgeting is done when a specific amount is assigned to a specific G/L account in order to have a better control when the amount is being credited or debited.

Step 1:

To create a budget click go on the following menu:

Main Menu --> Department --> Financial Management --> General Ledger --> G/L Budgets


Step 2: 

 Click on the button New and fill the following information

NameEnter the name of the budget
DescriptionGive a description for the button
Global Dimension 1 CodeGlobal Dimension 1 will display automatically
Global Dimension 2 CodeGlobal Dimension 2 will display automatically
Budget Dimension 1 CodeIf you want to put another dimension
Budget Dimension 2 CodeIf you want to put another dimension
Budget Dimension 3 CodeIf you want to put another dimension
Budget Dimension 4 CodeIf you want to put another dimension
BlockedIf the budget is not longer in use

Step 3:

Click on the button Edit Budget and add the following information


General
Budget NameThe Budget name will appear automatically
Show as LinesLet it be G/L Account
Show as ColumnLet it be period
View ByThe frequency you want to see, here we have chosen month
Rounding FactorIf you have any rounding factor
Show column NameInstead of month and year, you can display the name of the month completely
Budget Matrix
Budget AmountThis will represent the total amount of all the amount from months
Month (JAN 2020, FEB 2020)You will need to enter the amount budget for the specific G/L
Filters
Date FilterIf you want to filter by a specific date
G/L Account FilterIf you want to filter per G/L Account
G/L Account Category FilterIf you want to filter by Account Category
Income/Balance G/L Account FilterIf you want to filter by Income statement or Balance sheet
Global Dimension 1 CodeChoose a global dimension if you need
Global Dimension 2 CodeChoose a global dimension if you need
Budget Dimension 1 CodeUpon creating the budget if you have enter budget dimension it will appear here automatically
Budget Dimension 2 CodeUpon creating the budget if you have enter budget dimension it will appear here automatically
Budget Dimension 3 CodeUpon creating the budget if you have enter budget dimension it will appear here automatically
Budget Dimension 4 CodeUpon creating the budget if you have enter budget dimension it will appear here automatically

Click on OK to close.

Creation of G/L Account on Microsoft Dynamics Nav Business Central

Hello Friends,

In this tutorial, we will learn how to create a G/L account on business central. A general ledger account is used to debit and credit amount while a list G/L Account is know as a chart of account.

Step 1:

To create a G/L Account go on the following menu:

Main Menu --> Department --> Financial Management --> General Ledger --> Chart of account.


Step 2: 

Click on the button New and fill the required information

General
NoEnter the number of the G/L Account
NameEnter the name of the G/L Account
Name 2If the name is long, split the name and enter the second part here
Vendor NameIf the G/L account is linked with a vendor enter the vendor name
Bank Account NoIf the G/L account is linked with a bank account no enter the account no 
Income/BalancePrecise whether the account is an income statement or a balance sheet
Account CategorySelect an account category
Account SubcategorySelect an account subcategory
Debit/CreditAlways enter both
Account TypeSelect an account type
TotalingWhen you will indent the chart of account the totaling field will be populated automatically
Search NameIf you want to enter a search name for the G/L account
Direct PostingIf this field is checked, mean you can post transaction in the G/L Account
BlockedIf the G/L account is no longer in use, you can blocked it so that it will not appear in trial balance
Posting
Gen. Posting TypeEnter a General Posting Type
Gen. Bus. Posting GroupEnter a General Business Posting Group
Gen. Prod Posting GroupEnter a General Product Posting Group
VAT. Bus. Posting GroupIf the G/L Account is taxable enter the VAT Business Posting Group
VAT. Prod. Posting GroupIf the G/L Account is taxable enter the VAT Product Posting Group
Consolidation
Consol. Debit Acc.If consolidation need to be done, enter the Debit Account
Consol. Credit Acc.If consolidation need to be done, enter the Credit Account

Click on OK to close.

Sunday, April 12, 2020

Creation of Inventory Posting Setup on Microsoft Dynamics Nav Business Central

Dear Friends,

Today in our tutorial we will learn how to setup inventory posting. This setup determines the inventory account in the general ledger to which the program posts for transactions involving this item (any transaction related to Item Inventory).

Step 1:

To do the setup go on the following menu:

Main Menu --> Department --> Financial Management --> Setup --> Inventory Posting Setup


Step 2: 

Click on the button New and fill the required information.

Location CodeEnter the location
Inv. Posting Group CodeEnter the inventory posting group
DescriptionEnter a description
Inventory AccountEnter the inventory G/L account
Inventory Account (interim)If you want to use an interim account during good receive enter the G/L Account here
WIP AccountIn case you are you work in progress, enter the work in progress G/L Account
Material Variance AccountEnter the Material Variance G/L Account
Capacity Variance AccountEnter the Capacity Variance G/L Account
Mfg. Overhead Variance AccountEnter the Manufacturing Overhead Variance G/L Account
Cap. Overhead Variance AccountEnter the Capacity Overhead Variance G/L Account
Subcontracted Variance AccountEnter the subcontracted variance G/L Account

Thursday, April 9, 2020

Creation of Inventory Posting Group on Microsoft Dynamics Nav Business Central

Hello friends,

Today we will learn how to create an inventory posting group.

Step 1:

To proceed with the creation go on the following menu:

Main Menu --> Department --> Financial Management --> Setup --> Inventory Posting Group.


Step 2:

Click on the button New and fill the following information.

CodeEnter a code for the posting group
DescriptionEnter a description

Click on OK to close